Deploying Azure Kubernetes Service, Nginx and Redirecting your Custom Site with App Gateway
Guide on deploying Azure Kubernetes Service with manual installment of Nginx Ingress Controller, including routing to your own custom DNS
Network Architecture
Network architecture was set up similar to the architecture below. This guide focus on setting up only the Spoke Virtual Network.
 The ingress traffic is routed from the hub Azure Firewall into the spoke network via Private IP of the Application Gateway and DNAT translation. For testing purposes in this guide, access the AKS service through the public IP of the Application Gateway. In production scenario, all traffic should be routed using only private IP of the App gateway with proper firewall rules applied.
Setup Guide
Nginx update: A new managed Nginx Ingress Controller has been released, please deploy using this guide instead: Azure AKS App Routing
- Using Azure Portal deploy AKS Private Cluster with CNI Network
- Do select Bring your Own network in Network configurations
-
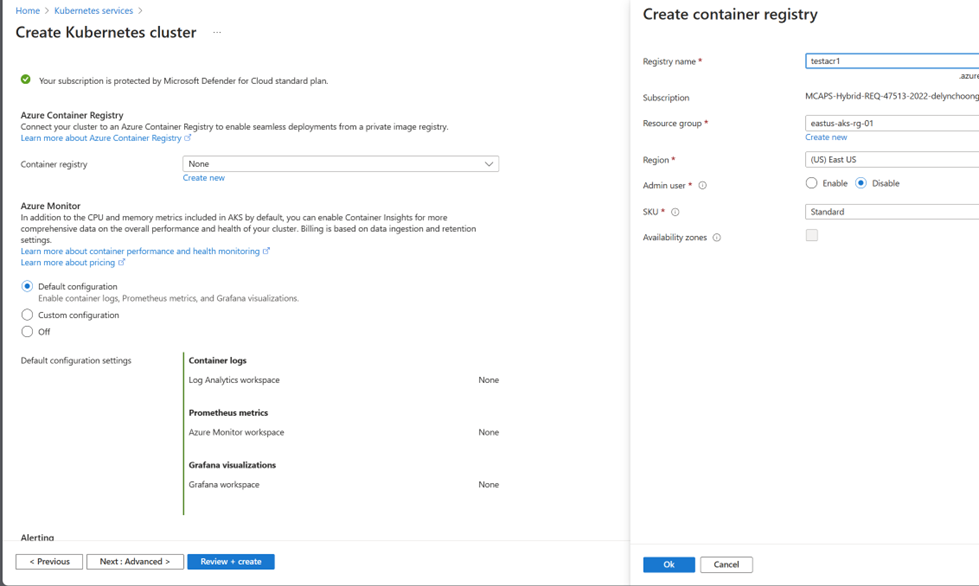
Connect an Azure Container Registry if required, or you can attach it later with this command:
az aks update -g <resource group name> -n <private aks name> --attach-acr <acr name> - Configure the rest of the settings as you require.
- Click “Review + Create”
- Validate the configurations and click “Create”
- Wait until the deployment is complete.
- Once deployment is finished, the next command can be run from Azure CLI or any CLI of your choice.
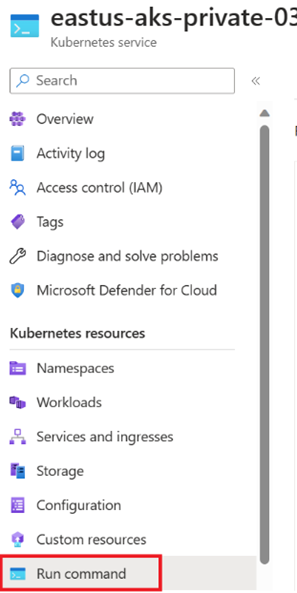
- Since this is a private AKS cluster, no internet traffic will be allowed to reach your cluster. To issue commands to your cluster, use the Az Command Invoke, a Jumpbox VM in the same virtual network as the AKS cluster, or use the Run Command from Azure Portal: https://learn.microsoft.com/en-us/azure/aks/access-private-cluster?tabs=azure-cli
- The next command is run in Azure cloud shell (bash)
-
Attach the Azure container registry
az aks update -g <resource group name> -n <private aks name> --attach-acr <acr name> -
Login to your AKS cluster
az aks get-credentials --resource-group <resource group name> --name <aks name> -
Pull the images from the registry
REGISTRY_NAME=<Azure Container Registry name> SOURCE_REGISTRY=registry.k8s.io CONTROLLER_IMAGE=ingress-nginx/controller CONTROLLER_TAG=v1.8.1 PATCH_IMAGE=ingress-nginx/kube-webhook-certgen PATCH_TAG=v20230407 DEFAULTBACKEND_IMAGE=defaultbackend-amd64 DEFAULTBACKEND_TAG=1.5 az acr import --name $REGISTRY_NAME --source $SOURCE_REGISTRY/$CONTROLLER_IMAGE:$CONTROLLER_TAG --image $CONTROLLER_IMAGE:$CONTROLLER_TAG az acr import --name $REGISTRY_NAME --source $SOURCE_REGISTRY/$PATCH_IMAGE:$PATCH_TAG --image $PATCH_IMAGE:$PATCH_TAG az acr import --name $REGISTRY_NAME --source $SOURCE_REGISTRY/$DEFAULTBACKEND_IMAGE:$DEFAULTBACKEND_TAG --image $DEFAULTBACKEND_IMAGE:$DEFAULTBACKEND_TAG -
Check the available IP address in the subnet, use the Virtual network that you have configured previously.
az network vnet subnet list-available-ips --resource-group <resource group name> --vnet-name <virtual network name> -n <subnet name> - Now switch over to run the command from your AKS cluster in Azure Portal. Select “Run Command” from the left blade:
-
Run the command below to create Nginx Ingress Controller using helm and pull the image from the Azure Container Registry set up previously. Change the IP Address to one of the available IPs returned in step #14. Ensure azure-load-balancer-internal=true is set. Note: Use && to append your commands as run commands will not remember previous lines
helm repo add ingress-nginx https://kubernetes.github.io/ingress-nginx && helm repo update && ACR_URL=<Your ACR URL, including azurecr.io> && kubectl create namespace ingress-basic && helm install ingress-nginx ingress-nginx/ingress-nginx \ --namespace ingress-basic \ --set controller.replicaCount=2 \ --set controller.nodeSelector."kubernetes\.io/os"=linux \ --set controller.image.registry=$ACR_URL \ --set controller.image.image=ingress-nginx/controller \ --set controller.image.tag=v1.8.1 \ --set controller.image.digest="" \ --set controller.admissionWebhooks.patch.nodeSelector."kubernetes\.io/os"=linux \ --set controller.service.loadBalancerIP=<Your IP Address> \ --set controller.service.annotations."service\.beta\.kubernetes\.io/azure-load-balancer-internal"=true \ --set controller.service.annotations."service\.beta\.kubernetes\.io/azure-load-balancer-health-probe-request-path"=/healthz \ --set controller.admissionWebhooks.patch.image.registry=$ACR_URL \ --set controller.admissionWebhooks.patch.image.image=ingress-nginx/kube-webhook-certgen \ --set controller.admissionWebhooks.patch.image.tag=v20230407 \ --set controller.admissionWebhooks.patch.image.digest="" \ --set defaultBackend.nodeSelector."kubernetes\.io/os"=linux \ --set defaultBackend.image.registry=$ACR_URL \ --set defaultBackend.image.image=defaultbackend-amd64 \ --set defaultBackend.image.tag=1.5 \ --set defaultBackend.image.digest="" \ --debug -
Wait for a few minutes for the new IP to be assigned. You can view this by running:
kubectl get services --namespace ingress-basic - The External IP should be assigned:

-
Now create the applications in the service, in this example it will be saved as aks-helloworld-one.yaml.
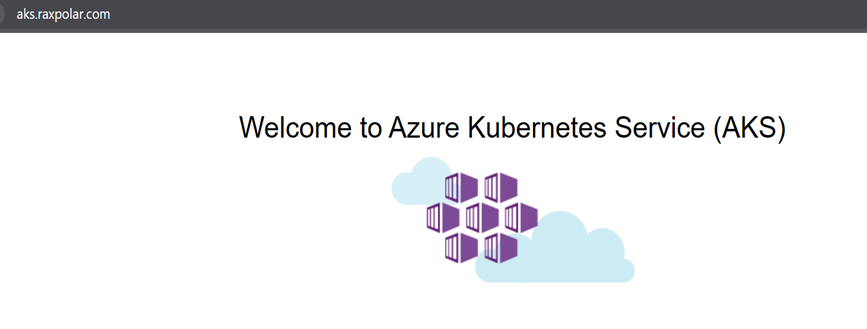
apiVersion: apps/v1 kind: Deployment metadata: name: aks-helloworld-one spec: replicas: 1 selector: matchLabels: app: aks-helloworld-one template: metadata: labels: app: aks-helloworld-one spec: containers: - name: aks-helloworld-one image: mcr.microsoft.com/azuredocs/aks-helloworld:v1 ports: - containerPort: 80 env: - name: TITLE value: "Welcome to Azure Kubernetes Service (AKS)" --- apiVersion: v1 kind: Service metadata: name: aks-helloworld-one spec: type: ClusterIP ports: - port: 80 selector: app: aks-helloworld-one -
Create another application called aks-helloworld-two.yaml
apiVersion: apps/v1 kind: Deployment metadata: name: aks-helloworld-two spec: replicas: 1 selector: matchLabels: app: aks-helloworld-two template: metadata: labels: app: aks-helloworld-two spec: containers: - name: aks-helloworld-two image: mcr.microsoft.com/azuredocs/aks-helloworld:v1 ports: - containerPort: 80 env: - name: TITLE value: "AKS Ingress Demo" --- apiVersion: v1 kind: Service metadata: name: aks-helloworld-two spec: type: ClusterIP ports: - port: 80 selector: app: aks-helloworld-two -
Deploy the applications:
kubectl apply -f aks-helloworld-one.yaml --namespace ingress-basic kubectl apply -f aks-helloworld-two.yaml --namespace ingress-basic -
Create a new file called hello-world-ingress.yaml to set up ingress routing:
apiVersion: networking.k8s.io/v1 kind: Ingress metadata: name: hello-world-ingress annotations: nginx.ingress.kubernetes.io/ssl-redirect: "false" nginx.ingress.kubernetes.io/use-regex: "true" nginx.ingress.kubernetes.io/rewrite-target: /$2 spec: ingressClassName: nginx rules: - host: aks.raxpolar.com http: paths: - path: /hello-world-one pathType: Prefix backend: service: name: aks-helloworld-one port: number: 80 - path: /hello-world-two pathType: Prefix backend: service: name: aks-helloworld-two port: number: 80 - path: / pathType: Prefix backend: service: name: aks-helloworld-one port: number: 80 --- apiVersion: networking.k8s.io/v1 kind: Ingress metadata: name: hello-world-ingress-static annotations: nginx.ingress.kubernetes.io/ssl-redirect: "false" nginx.ingress.kubernetes.io/rewrite-target: /static/$2 spec: ingressClassName: nginx rules: - host: aks.raxpolar.com http: paths: - path: /static(/|$)(.*) pathType: Prefix backend: service: name: aks-helloworld-one port: number: 80 -
Deploy the ingress route file:
kubectl apply -f hello-world-ingress.yaml --namespace ingress-basic -
View the Deployed ingress
kubectl get ingress -n ingress-basic

- Create App Gateway in Portal, use WAF v2 tier. For the purpose of this guide, App gateway was created with Both Private and Public IP. In production only private IP should be used.
- In the settings, ensure it is in the same virtual network as the AKS cluster
- Create a new subnet for the application gateway and configure app gateway to that subnet
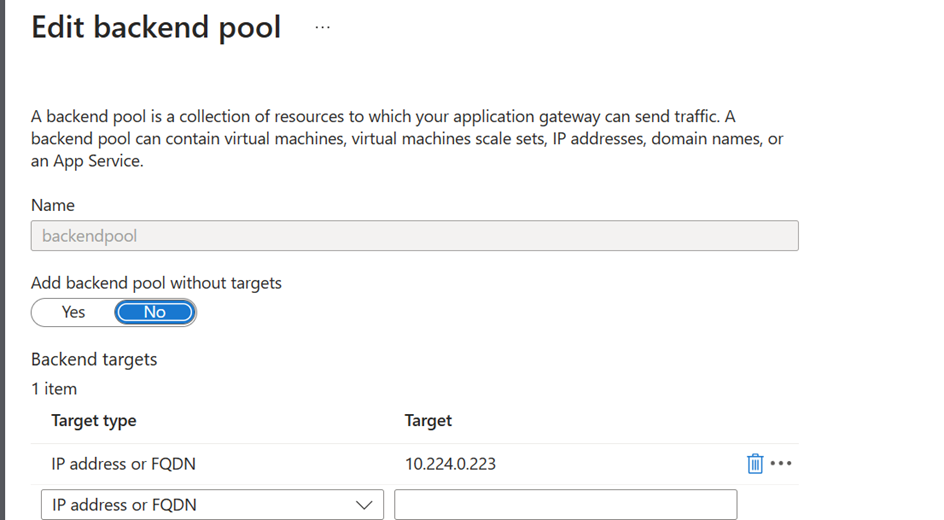
- Set backend pool to point to the External IP address that was set in Step #24
- Create backend settings and point to the custom domain:
- Create the listener pointing to the custom domain and assign to the Frontend IP configuration
- Configure the rule for the backend pool and backend settings
- Leave other settings all as default or as needed. Save the App gateway.
- Now configure the Custom Domain name to point to the public IP of the application gateway (For the purpose of this guide a public IP is used, private IP should be used for production)
- Make sure to add in your domain registrar the new record for your Custom Domain with A record, and the Application Gateway Public IP
- Then create a DNS Zone in Azure portal
- Create a Record set:
- Save the settings.
- Finally go to the browser and navigate to the custom domain. You will be able to view your application